How to Create an ERC-20 Token
A token is an incredibly powerful feature of the Ethereum virtual machine, as it can represent virtually anything from financial assets to skills of a game character, to a fiat currency, and so much more.
Why build your own ERC-20 token?
The ERC-20 token standard is the most popular way to create fungible cryptocurrencies on Ethereum and EVM-compatible blockchains, and therefore allows builders and creators to develop digital assets for their protocol, marketplace, metaverse, or community.
This tutorial will teach you how to create your own ERC-20 token on Elastos’s ESC Testnet using MetaMask, HardHat, and Solidity code snippets. At the end of this tutorial, you will be able to deploy your own ERC-20 token smart contract. The estimated time to complete this guide is 15 minutes.
What is the ERC-20 token standard?
The ERC-20 token standard ensures that all tokens have the same properties, including that all tokens are fungible (any one token is exactly equal to any other token), and no tokens have special properties or rights associated with them.
This means that for a token to follow the ERC-20 token standard, it must implement the following API methods and events:
totalSupply- a method that defines the total supply of your tokens, and stops creating new tokens when the totalSupply limit is reached.balanceOf- a method that returns the number of tokens a wallet address contains.transfer- a method that transfers in a certain amount of tokens from the total supply and sends it to a user.transferFrom- a transfer method that transfers ERC-20 tokens between usersapprove- verifies whether a smart contract is allowed to allocate a certain amount of tokens to a user, considering the total supply.allowance- checks if a user has enough balance to send a token to another user.
ERC-20 tokens are fungible (can be interchanged) because they have the same value and properties. There are also non-fungible token standards and semi-fungible token standards such as ERC-721 and ERC-1155 tokens.
How to Create an ERC-20 Token
In four steps you’ll create and deploy an ERC-20 token on the ESC test network, using Metamask, Solidity, and Hardhat. This ESC testnet ERC-20 token will have all the characteristics required above, making it a valid ERC-20 token.
Step 1: Create a Metamask Wallet
We need an ESC testnet wallet to send and receive transactions. For this tutorial, we’ll use Metamask, a virtual wallet in the browser.
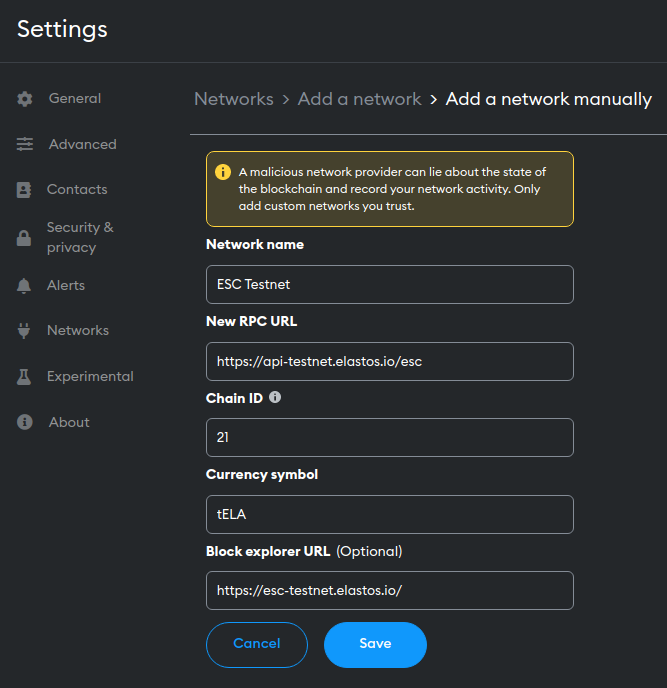
You can download and create a Metamask account for free here. Once you have an account, you'll need to configure the network to use the ESC testnet. This can be accomplished in MetaMask by navigating to Settings -> Network-> Add Network -> Add a Network Manually and entering the following information:
- Network name: ESC Testnet
- New RPC URL:
https://api-testnet.elastos.io/esc - Chain ID: 21
- Currency symbol: tELA
- Block explorer URL:
https://esc-testnet.elastos.io/
Step 2: Get some tELA from the Faucet
In order to deploy our smart contract to the test network, we’ll need some fake ELA. You can acquire some by visiting the faucet.
Simply enter your address, verify your humanity and press the 'Request 1 ESC' button.
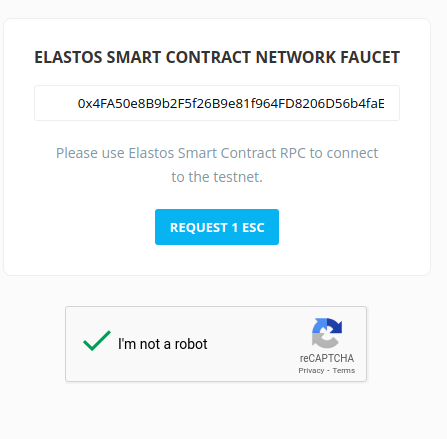
If all goes well, you should see your tELA balance updated on Metamask.
Step 3: Create a Node Project
Let's create an empty node project. Navigate to your command line and type:
mkdir my-token && cd my-token
npm init -y
Next, go to the my-token project root directory and type mkdir contracts and mkdir scripts into your command line to create two new folders that will organize your ERC-20 smart contracts and your deployment scripts:
mkdir contracts
mkdir scripts
We are now in a good position to set up and install Hardhat, the industry standard development environment for Ethereum Virutal Machine (EVM) compatible blockchains (which ESC is).
Step 4: Create a Hardhat Project
Hardhat is a development environment to compile, deploy, test, and debug smart contracts. It helps developers create dApps locally before deploying them to a live chain.
In your terminal, run the following commands:
npm install --save-dev hardhat
npx hardhat
You should then see a welcome message and options on what you can do. Select Create a JavaScript project:
888 888 888 888 888
888 888 888 888 888
888 888 888 888 888
8888888888 8888b. 888d888 .d88888 88888b. 8888b. 888888
888 888 "88b 888P" d88" 888 888 "88b "88b 888
888 888 .d888888 888 888 888 888 888 .d888888 888
888 888 888 888 888 Y88b 888 888 888 888 888 Y88b.
888 888 "Y888888 888 "Y88888 888 888 "Y888888 "Y888
👷 Welcome to Hardhat v2.12.2 👷
? What do you want to do? …
❯ Create a JavaScript project
Create a TypeScript project
Create an empty hardhat.config.js
Quit
Agree to all the defaults (project root, adding a .gitignore, and installing all sample project dependencies).
To check if everything works properly, run:
npx hardhat test
We now have our hardhat development environment successfully configured. Let us now install the OpenZeppelin contracts package. This will give us access to ERC20 implementations (the standard for tokens) on top of which we will build our contract.
npm install @openzeppelin/contracts
Step 5: Connect Metamask & Elastos to your Project
Now that we've created a Metamask wallet and a smart contract, it’s time to connect them.
Every transaction sent from your virtual wallet requires a signature using your unique private key. To provide our program with this permission, we can safely store our private key in an environment file.
Install the dotenv package in your project directory by running:
npm install dotenv --save
Then, create a .env file in the root directory of our project, and add your Metamask private key and HTTP Alchemy API Key (from Step 1) to it.
Your .env file must be named .env! Do not change the file name.
Follow these instructions to export your private key from Metamask
Your .env should look like this:
PRIVATE_KEY = "your-metamask-private-key";
Step 6: Update hardhat.config.js
We’ve added several dependencies and plugins so far, now we need to update hardhat.config.js so that our project knows about all of them.
Replace the contents of hardhat.config.js with the following:
require("dotenv").config();
require("@nomiclabs/hardhat-ethers");
const { PRIVATE_KEY } = process.env;

module.exports = {
  solidity: "0.8.0",
  defaultNetwork: "esc_testnet",
  networks: {
    hardhat: {},
    esc_testnet: {
      url: "https://api-testnet.elastos.io/esc",
      accounts: [`0x${PRIVATE_KEY}`],
    },
  },
};
Step 7: Write ERC-20 Token Smart Contract
Here’s how to write the token contract for your ERC-20 token using Solidity, which is like Java and JavaScript, or C and C++:
- Open up the
my-tokenproject in your code editor. - Navigate to your
/contractsfolder - Open a new
.solfile and name the.solfile the same name as your token.
To create and work with your smart contract file, you must have a name that matches the name of your token. For example, to create a token named Web3Token, your contract file name should be Web3Token.sol.
Copy and paste this code snippet based on the OpenZeppelin ERC 20 implementation:
//SPDX-License-Identifier: Unlicense
pragma solidity ^0.8.0;

import "@openzeppelin/contracts/token/ERC20/ERC20.sol"; // OpenZeppelin package contains implementation of the ERC 20 standard, which our NFT smart contract will inherit

contract HappyHedgehog is ERC20 {
uint constant \_initial_supply = 10000 \* (10\*\*18); // setting variable for how many of your own tokens are initially put into your wallet, feel free to edit the first number but make sure to leave the second number because we want to make sure our supply has 18 decimals

    /* ERC 20 constructor takes in 2 strings, feel free to change the first string to the name of your token name, and the second string to the corresponding symbol for your custom token name */
    constructor() ERC20("HappyHedgehog", "HH") public {
        _mint(msg.sender, _initial_supply);
    }

}
The token symbol you choose, in our case "HH" can be any arbitrary character length but do keep in mind that some UIs may display ones that are too long differently.
Feel free to edit the initial supply by changing the 10000 to how many tokens you would like your initial supply to be! You can put any number you'd like for this - make sure to leave the (10**18) as that multiplies the number we want as our supply to have 18 decimals.
Step 8: Write a Deployment Script for your ERC-20 Token
Now that your token contract is written, write your smart contract deployment script by:
- Navigating to the
/scriptsfolder - Creating a new file called
deploy.js - Opening the
deploy.jsfile - Copying and pasting this ERC-20 deployment code snippet:
async function main() {
  const [deployer] = await ethers.getSigners();

  console.log("Deploying contracts with the account:", deployer.address);

  const weiAmount = (await deployer.getBalance()).toString();

  console.log("Account balance:", await ethers.utils.formatEther(weiAmount));

  // make sure to replace the "HappyHedgehog" reference with your own ERC-20 name!
  const Token = await ethers.getContractFactory("HappyHedgehog");
  const token = await Token.deploy();

  console.log("Token address:", token.address);
}

main()
  .then(() => process.exit(0))
  .catch((error) => {
    console.error(error);
    process.exit(1);
  });
Step 9: Deploy your ERC-20 Token to the ESC testnet
To deploy your ERC-20 token, navigate to your root directory and run the following command:
npx hardhat run scripts/deploy.js --network esc_testnet
Your contract will be compiled and deployed to the ESC test network! You should see a message appear with information about the smart contracts you are deploying including your account address, account balance, and token address.
Go to https://esc-testnet.elastos.io/ and input your token address to see your deployed ERC-20 contract. If you want to verify the contract, follow the guide here.
Step 10: Send Some Tokens!
That's it! You successfully deployed your own ERC-20 token on the Elastos Smart Chain testnet using the OpenZeppelin ERC20 standard. Now you can add your ERC-20 token to MetaMask and send it to any address via the UI, or write your own Hardhat script to do an airdrop!
To do the same on ESC, simply swap the network details from testnet to mainnet. Connection information can be found here.